- Python Web - Django Framework
- Django Framework - Overview
- Django Framework - Users
- Django Framework - Installation
- Django Framework - Creating Application
- Python Web - Flask Framework
- Python Web - Flask Framework
- Flask Framework - Creating URL Routing
- Flask Framework - Using Templates
- Python Web - Pyramid Framework
- Python Web - Pyramid Framework
- Pyramid Framework - Core Concepts
- Pyramid Framework - Creating Application
- Python Web - Dash Framework
- Python Web - Dash Framework
- Dash Framework - App Layout
- Dash Framework - HTML Component
- Dash Framework - Visualization
- Python Web - py4web Framework
- Python Web - py4Web Framework
- py4web Framework - Dashboard
- py4web Framework - Creating Application
- Python Web - Miscellaneous
- Python Web - Web2py Framework
- Python Web - Choosing a Better Framework
- Python Web Development Libraries Resources
- Python Web - Quick Guide
- Python Web - Useful Resources
- Python Web - Discussion
Django Framework - Creating Application
To keep everything clear, we will create a separate application inside our project. Below, we'll try to create a blog web application by running below mentioned simple command.
(myenv) D:\Projects\python\myenv\myFirstDjangoProject>py manage.py startapp myBlog

(myenv) D:\Projects\python\myenv\myFirstDjangoProject>
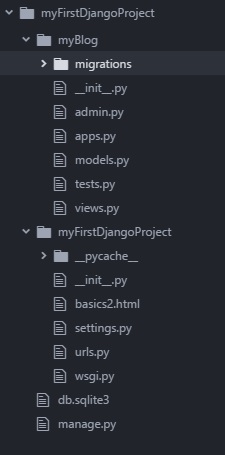
Now we will notice that a new myBlog directory is created and it contains a number of files now. The directories and files in our project should be as following −
After creating an application, we also need to tell Django to use it. We do that in the file myFirstDjangoProject/settings.py.
INSTALLED_APPS = [
   'django.contrib.admin',
   'django.contrib.auth',
   'django.contrib.contenttypes',
   'django.contrib.sessions',
   'django.contrib.messages',
   'django.contrib.staticfiles',
   'myBlog',
]
Creating a blog post model
In the myBlog/models.py file, we define all objects called Models this is a place in which we will define our blog post.
Lets open myBlog/models.py, remove everything from it, and write code as follows −
models.py
from django.db import models
from django.utils import timezone

class Post(models.Model):
    author = models.ForeignKey('auth.User', on_delete=models.CASCADE)
    title = models.CharField(max_length=220)
    text = models.TextField()
    created_date = models.DateTimeField(default=timezone.now)
    published_date = models.DateTimeField(blank=True, null=True)

    def publish(self):
       self.published_date = timezone.now()
       self.save()

    def __str__(self):
       return self.title
Firstly, we import some functionalities from other files by calling from or import. So with this, instead of copying and pasting the same things in every file, we can include some parts with from and import.
class Post(models.Model) − This line defines our model (it is an object).
class is a special keyword that indicates that we are defining an object.
Post is the name of our model. Always start a class name with an uppercase letter.
models.Model means that the Post is a Django Model, so Django knows that it should be saved in the database.
Now let us discuss about the properties we defined above: title, text, created_date, published_date and author. To do that, we need to define the type of each field.
models.CharField − This is how you define text with a limited number of characters.
models.TextField − This is for long text without a limit.
models.DateTimeField − This is for date and time.
models.ForeignKey − This is a link to another model.
We define a function/method with def and publish is the name of the method.
Methods often return something. Here when we call __str__(), we will get a text (string) with a Post title.
Creating tables for models in your database
The final step is to add a new model to our database. First, we have to let Django understand that we have made some changes in our model. Let us do the same in our console window with command py manage.py makemigrations myBlog as shown below −
(myenv) D:\Projects\python\myenv\myFirstDjangoProject>py manage.py makemigrations myBlog
Migrations for 'myBlog':
  myBlog\migrations\0001_initial.py
    + Create model Post
Then, Django prepares a migration file that we now have to apply to our database. In our console we can type: py manage.py migrate myBlog and the output should be as follows −
(myenv) D:\Projects\python\myenv\myFirstDjangoProject>py manage.py migrate myBlog
Operations to perform:
  Apply all migrations: myBlog
Running migrations:
  Applying myBlog.0001_initial... OK
Our Post model is now in our database.
Django Admin
To add, edit and delete the posts weve just modelled, we are using Django admin.
So let us open the myBlog/admin.py file and put below contents in this −
from django.contrib import admin
from .models import Post

# Register your models here.
admin.site.register(Post)
Firstly, we import (include) the Post model defined in the previous chapter. To make our model visible on the admin page, we need to register the model with admin.site.register (Post).
To login to an admin site, you need to create a superuser a user account that has control over everything on the site. So stop the webserver and type in command line py manage.py createsuperuser, and press enter.
(myenv) D:\Projects\python\myenv\myFirstDjangoProject>py manage.py createsuperuser
Username (leave blank to use 'mahes'): admin
Email address: admin@tutorialspoint.com
Password:
Password (again):
Superuser created successfully.
Ok, so its time to look at our Post model. Remember to run python manage.py run server in console to run the web server. Go to your browser and type the address http://127.0.0.1:8000/admin/ Log in with the credentials we have just chosen. Then you should see the Django admin dashboard as below −
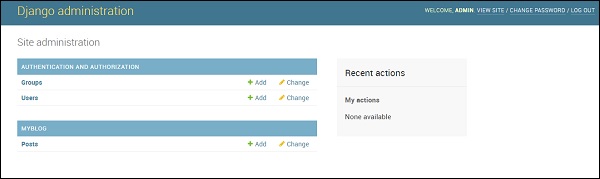
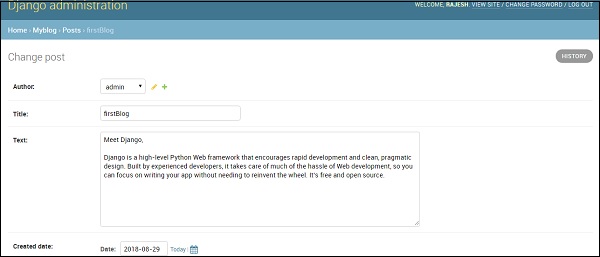
Go to Posts and experiment a little with it. You can add many blog posts, and contents from anywhere. Your blog will look something like this −
This is just an overview of Django and we are able to create a blog with just a few lines of code.
